Building Projectors
Uploading Media & Creating Categories
Building your Users Projector is fun! Projector allows you to build a custom streaming service like Netflix and Disney+ where you create categories so your users can navigate to their home movies.
The following are suggestions to help you with your workflow process. This is to help assist you with being as efficient as possible with your valuable time. We are committed to create additional tools over time to help with your efficiency.
The User’s Projector can be chronological or thematical, or even a combination, depending on their wishes You can opt to do it all for them, or just get them started. Whichever route you choose we recommend charging your User for time & labor just as you do for the other services you offer. We will discuss specific ways of how to price for this in the Positioning Module.
Preparing your video files for Uploading
- Confirm the email address the User would like to use for their Projector account
- Determine the title for each video or ask for a list of titles for the videos and photo slide shows if you will be providing those naming services. The Title is tagged to each video and will be visibly attached to that video so you will want to make each title unique. You can opt to create a “default” numbering system for each video. Titles can be edited by the User afterward.
- We suggest assigning the titles prior to the upload because Projector will auto-populate the title of the video with the name you’ve given each video file
- Here are some examples of how to name your video files:
- Start the name with the year to put them in chronological order
- Start the name with a number: 01, 02, etc. to put them in numerical order
- Start the name with a number first followed by:
- Year
- Theme
- Family name
- Family member name
- Here are some examples of how to name your video files:
- We suggest assigning the titles prior to the upload because Projector will auto-populate the title of the video with the name you’ve given each video file
- Determine the User’s Category details or ask for a list of Categories if you will be providing those design services. A Category is the ability to put a series of videos under a certain subject matter. (i.e. Birthdays). A video can be in both a Category and a Play List if desired by the User. You can opt to create just one “default” Category called Family Videos. Categories can be edited by the User afterward.
- If the User chooses to delete a Category the videos will automatically go back to the Draft Tab.
- Determine the user’s Visibility. This setting determines which viewers can watch videos & photo albums. You can opt to set a “default” Visibility for each User, such as “Visible for all Invited Viewers”
Getting Started with Video Uploading
- Log into your Projector account
- Click on your profile to access User Management
- This will bring you to your Affiliate Portal and you will see a list of accounts you can access
- Choose the customer account you want to access
- Click on the Upload button located in the center of the screen or in the upper right hand corner
- Here you have three choices of how you wish to upload:
- One video at a time uploading
- 2-10 videos at a time via Bulk uploading
- Draft uploading
1) Video Uploading: one video at a time
The main reason to choose uploading one video at a time:
- The ability to customize the details of each individual video before you upload; including such fields as thumbnail, title, category & visibility, without having to go back into Edit after the upload is completed to make these customizations.
How to upload one video at a time:
- Select the first video file to upload
- The “Details” box will open
- The video Title & Thumbnail will auto-populate
- You may choose to edit Title and/or Thumbnail now or after publishing
- Click Next
- The “Categories” box will open
- Select a Category at this step and click Next
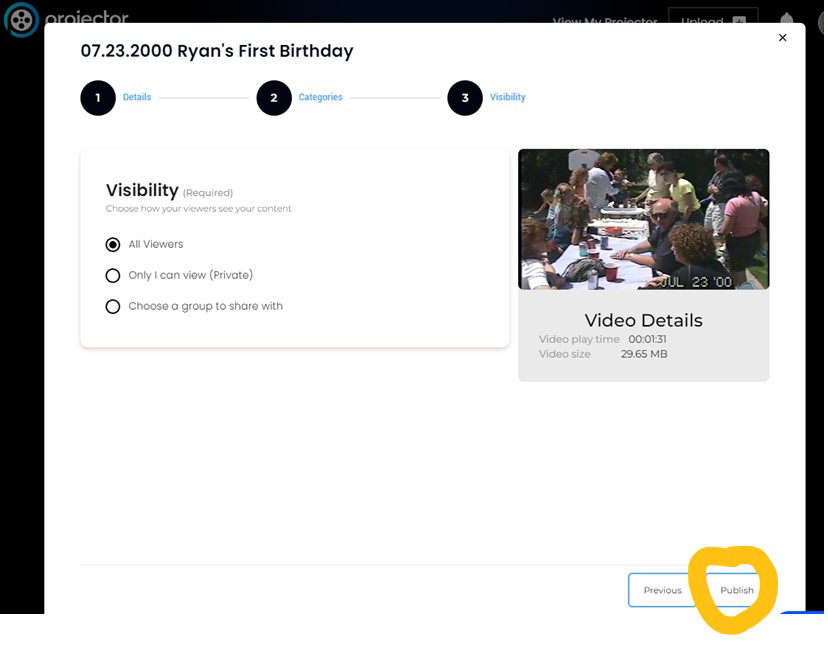
- The Visibility box will open
- “All Viewers” is the Visibility default, but you can choose to change it here
- Click “Publish”
- Remember to keep your window browser open until all videos have finished uploading & processing

- Choose next video to upload and continue steps 1-8 until all your videos are uploaded and Published
2) Video Uploading: 2-10 videos via Bulk Uploading
The main reason to choose Bulk Uploading:
The ability to upload up to 10 videos all at once when no customization of details is required at the time of uploading, including the thumbnail, which would defeat the purpose of the bulk upload process.
Please note: all fields are auto-populated, including only ONE thumbnail, when choosing Bulk Upload. You will have the option to customize these fields after bulk uploading & publishing all videos.
How to upload via Bulk Uploading:
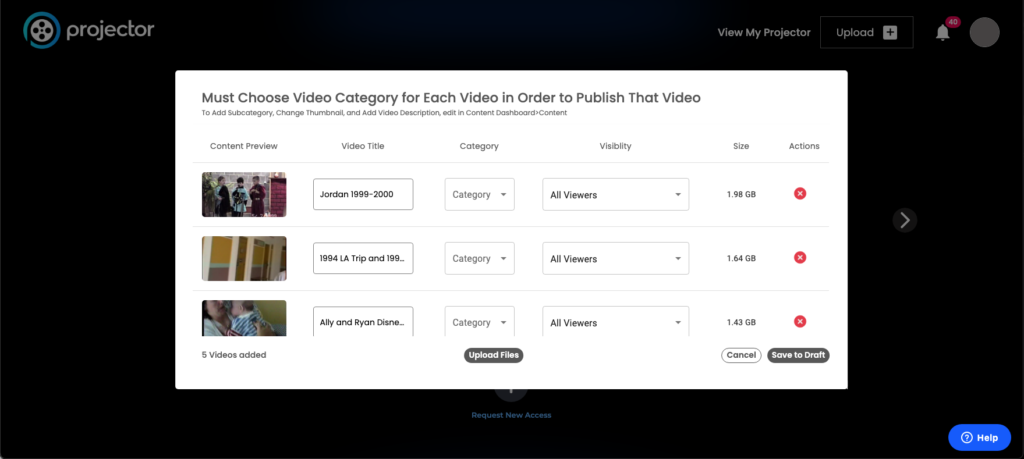
- Drag & Drop or choose between 2 and 10 videos to upload
- Choose Video Category for each video to Publish all at once (Videos not assigned a Category during this step will go into Draft Tab; not Published)
- Change Title here if desired (original file name will auto-populate)
- Visibility defaults to All Viewers

Once all videos have been assigned a category, the Publish & Save option will appear.
- Click Publish & Save to upload all videos at once
- Remember to keep your window browser open until all videos have finished uploading & processing
- All published videos will be available immediately in the Content Dashboard
To add or edit any video details, such as Sub-category, Thumbnail or Playlist
- Go to the Content Dashboard within the Projector account you wish to add/edit
- Click on Content
- Click on the circle next to the video you want to Publish
- Click on Edit

- The Details box will open
- Follow steps 3-8 in the “Video Uploading: one video at a time” section above.
3) Video Uploading: Draft Process
The main reason to choose uploading via Draft:
The ability to start your upload process but only in a draft mode. Fields can be bypassed and filled in when you are ready to publish the video. Each video will remain in Draft and will not be published or available for the user to view until all required details are completed for that particular video.
How to upload using Draft
- Select the first video to upload
- The “Details” box will open
- Click Next
- The Categories box will open
- Click Next
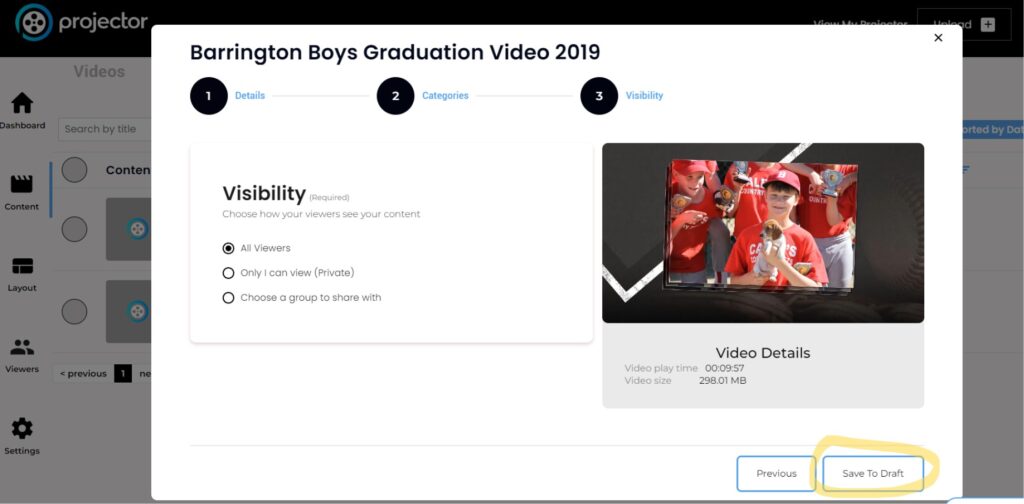
- The Visibility box will open
- All Viewers is set at the default but can be edited at the time of publishing
- Click Save To Draft

All videos will upload into Draft with their upload status tracking while you continue to upload more videos. Each video will remain in Draft until you have completed all details and publish them.
How to Publish from Draft:
- Go to Drafts within Content of the User’s Projector
- Click on the circle next to the video you want to Publish
- Click on Edit

- The Details box will open
- Follow steps 3-8 in the “Video Uploading: one video at a time” section above.
About Visibility
The following are the descriptions of our Visibility settings:
“All Invited Users Can View”
By selecting this option for your uploaded video or photo album, all viewers your user invites will have access to view this content.
“Only I Can View“
By selecting this option for your uploaded video or photo album, only the user of the account can view this content. No viewers will be able to view this content.
“Choose A Group To Share With“
By selecting this option for your uploaded video or photo album, only viewers who are added to the assigned groups will have access to view this content
Because Projector is a private library meant mostly for family and close family friends, we suggest selecting “All Invited Viewers Can View” unless there are specific videos you want to avoid sharing with all your Viewers. If all content is assigned to “all invited viewers can view”, this will share the user’s entire Projector. For more information on Visibility see the Visibility section
Optional Video Organization
Content Layout: Optional Fields: Description, Sub-Category & Playlist
- Description
- Add details beyond the title & category for further sorting & searching capabilities
- The Description field is limited to 150 characters
- Sub-Category
- Add a sub-category for better sorting & searching
- The Sub-Category field is limited to 17 characters
- Playlist
- Add videos to playlists playing videos within certain sort criteria